X Phi positioning system for inspection of wafers, biological samples (clean room ISO 5) | rotary axis and linear stage
Inspection and Mikroscopy
782424:005.26
High-precision linear-rotatory positioning
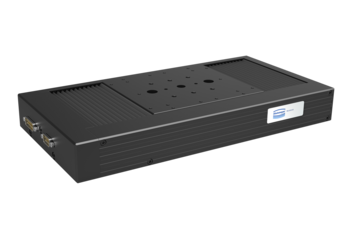
This X Phi system allows the positioning of samples (e.g. wafers, biological samples) at a precisely defined angle to the sensor or camera. It consists of a linear X-axis, the precise standard linear stage PMT160 with ball screw, and an integrated rotary unit with unlimited travel, driven by flat belts.For cleanroom suitability, the cable guides for both the centered measuring system and the moving rotary unit were housed within the linear system enclosure. Bellows seal off the system from the outside to prevent particle emission.
Maintenance-free positioning system for clean rooms
|
|
|
|
|
Optional expandable:
|
Individual extensions and customizations
Engineering services include the fitting of the systems to your structure and the desired controlls. Furthermore, we develop prototypes and like to adapt the systems to the environmental requirements of your application particle emission, radiation, temperature, precision special parts manufacturing, working height, collision protection, safety concept, compensation factor and filter, sensor mounting, brake, decoupling, special lubrication, special colors, holders, adapters, special motors with pharmaceutical approval, comprehensive documentation, test protocoll, llife cycle testsFields of application
This system has now been supplied in several variants for various cross-industry applications over many years as a series for e.g.: Manufacturing / inspection / quality assurance of small medical components, pharmaceutical inspection, measurement of biological samples, alignment and inspection of optical components, assembly systems in microelectronics, AOI (Automatic Optical Inspection), chipping / crack / defect detection, surface inspection, layer thickness measurement with one sensor, inspection of wafers, chips, die, pins, bonding, printed circuit boards, solar cells
This system was developed for the first time for high-precision layer thickness measurement of wafers with only one sensor. The chuck is rotated on the rotary stage and moved into measuring position to optically measure the surface of the rotating wafer with one sensor. In addition, this can be moved to the customer-specific loading station for increased process automation.
782424:005.26 |
| X | Phi |
[mm; deg] | 200 | n x 360 | |
Repeatability unidirectional | [µm; deg] | ± 0.3 |
|
Repeatability bidirectional | [µm; deg] | ± 0.4 |
|
[N] | 150 | 150 | |
| Positioning speed | [mm/s; deg/s] | 25 | 200 |
Motor |
| ||
Drive |
| Belt | |
Feedback |
|
Used Standard Components
PMT160-DC

PMT160-SM

PMT160-EDLM
Are you looking for a technical solution for your application?
Get your first 3D Design in a few days:

Katja Weißbach
Consulting
T +49 351 88585-64
E-Mail

Ronald Schulze
Consulting, Project Management & Engineering
T +49 351 88585-67
E-Mail

Francisco Samuel
Consulting &
Project Management
T +49 351 88585-85
E-Mail

Elger Matthes
Consulting, Concepts, Innovation & Engineering
T +49 351 88585-82
E-Mail
Our references


